Wednesday, March 30, 2016

MARCH EMBROIDERY SAL

Been a bit slack with my blogging lately, too much talking and not enough sewing !!

I love to try new techniques, and when I was visiting the beautiful Mill Rose Cottage late last year, I picked up some  Sashiko embroidery panels.  The lines are pre-printed onto the panel and all you do is stitch using a running stitch.

  I used a Sashiko thread which is similar to a Perle Cotton, in a bright white colour to highlight the lovely pattern.  There are also special long needles that you should use but I found my embroidery needles did the trick.


You can see that I haven't embroidered all the outside crosses, as I am thinking of attaching a border and maybe even adding more panels for a table runner.

Now why not pop across to Martina at Sunshine Quilting and have a look at the other works of art that the lovely bloggers have done.  Always inspirational

Enjoy your day,
Dawn

Tuesday, February 9, 2016

FNwF - BABY GIRL


We are surrounded by babies at the moment....must be the season! 

I always like to do a baby quilt for my family and friends when they become parents or grandparents. I really wanted to try using minki fabric as the backing, but have been terribly afraid because of the stretch, but after reading up on how to sew it, I decided to give it a go.....


Using a pattern from Cluck Cluck Sew , I gathered my scraps of pink fabrics and teamed them with a plain Emma Louise white.


To add something different, I bordered the edges with grey dot material.


I was most afraid how to quilt the top with the minki.  Using my walking foot, I sewed straight crossed lines fairly wide to keep a nice soft feel.


I thought it was lovely and soft but then I washed it and wow it came up even  softer than before.  Now I think I will do all the babies quilts with the minki on the back.....so cuddly.

I think it turned out beautifully and it's off to its new owner next week. I'm sure she will love it!  


Friday, February 5, 2016

FBwF - Butterflies

What do you call lots of butterflies? .........a kaleidoscope (according to Google)

Well I'm surrounded by a kaleidoscope of butterflies this Friday night.  I spent my time drawing and cutting wings and bodies.


Still have a few more to cut out and then they will all come together into a baby quilt  for Harper. 

If you'd like to see what all the FNwF got up to, why not pop over here and visit everyone.

Happy stitching everyone :)

Wednesday, January 27, 2016

SAL 2016

Hooray .......joining the Sunshine Quilting Patchwork and Stitchery SAL 2016' has pushed me to finish a project that I had started in December.

Adding color to embroidery adds that extra zing to the finished project, and Jo from Gemelli Girls (check them out on Facebook) showed us how to combine coloring pencils and embroidery to achieve a beautiful result permanently!


First of all, we painted a small section of our printed embroidery pattern with a fabric medium


Then we colored that section in using Derwent Inktense pencils which actually have ink in the leads


Once the whole embroidery is colored and stitched, you iron the piece which sets the color permanently. You have the option to embroider first then color in or vice versa.

Add the border and hanging sleeve and it's ready to display


This ones ready for next Christmas and I'm thinking I might go over some of my old embroideries and color them too.


Friday, January 8, 2016

POPPIES

Happy New Year to all the sewing/quilting bloggers out there.

This is my first 2016 post and I thought I'd start off with a bright and colourful Poppy Quilt.
(that's Poppy as in the flower, not in the Nanny and Poppy type)

A while ago, the sewing girls had a day out to The Patchwork Teahouse in Warburton, where I saw a kit for this beautiful Poppy quilt.  Luckily for me, the kit included this large Centre Panel Piece:........


Plus three other coordinating patterned materials and a bright purple plain and a vivid yellow plain.


I am well on the way and have pieced all the nine small blocks that go around the main panel piece.


Can't wait to show you how it turns out, these colors are so delightful to work with, they just inspire happiness.

Bye for now
Dawn

Tuesday, December 22, 2015

BEST CHRISTMAS PRESENT

Well I got my Christmas Present early.....Harper Layla came into the world last Wednesday morning.

As you can imagine, we are all thrilled and both my daughter and Harper are doing wonderfully.  They only stayed in hospital overnight (not like my day when we had a whole week in there!) so let the celebrations begin.

We tend to forget just how small babies are, even though they are perfect in every detail.


I felt that Harper needed a special toy for Christmas and I went searching for a pattern.  I found a lovely bright Fox in a Homespun Magazine.  So for my first attempt at a softy, I fell in love with it


The button eyes were just pinned on in this picture, but I have since changed them to felt eyes so there's no danger of small parts coming off.


Jake loved Mr Fox and was very proud to put it in Harpers room, so now I'm making another one for him to match (in boys colours of course).

Having grandchildren brings so many joys and so much more sewing to do.....I think I need to retire now (hint hint)

I sincerely hope that you have a wonderful Christmas with your family and friends and I look forward to blogging with you in 2016


Dawn
xxxxx

Thursday, December 10, 2015

TRAPUNTO CUSHION

Been busy lately (as has everyone else) and I havent been posting much...sorry (I still read all of yours though)

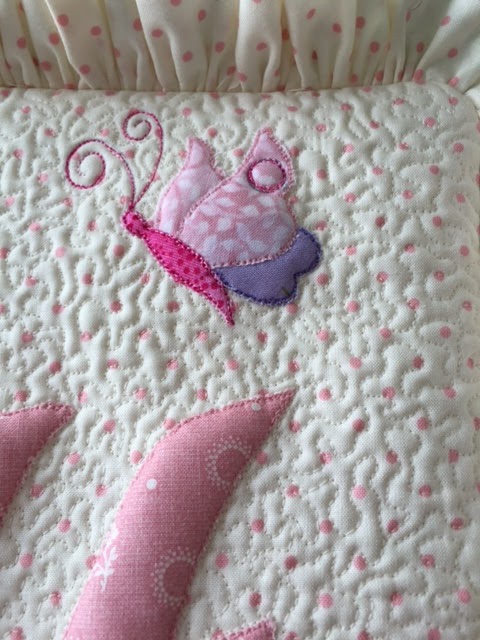
With my second grandchild due any day now, my very pregnant daughter asked for a cushion for the baby girls room.  She asked for a H on the cushion (wonder what the name will be??)

I found a wonderful tutorial on Pinterest (dont you just love that site) from Quilted Hugs and Other Nonsense.


It was extremely easy to do, I simply cut out the shapes and using Steam-A-Seam, ironed them onto the spotted square.  Then with a layer of batting behind, I raw edged all the shapes.  I then cut away all the loose batting.  This left just the shapes in batting.


Another full layer of batting behind, and I sewed around the outside of the shapes.  This made them stand out but then I stippled all the cushion front.  This REALLY made my applique POP right out.


A ruffle around the edge and a zippered backing and its finished.


Now all we need is the baby....


Sunday, November 22, 2015

BUCILLA FAIRY BALLERINA STOCKING

Christmas sewing is such a delight and I particularly love the Bucilla range of Christmas Stockings.

After I discovered Debbie from andsew4th and the fantastic Christmas Stockings she has made,  (she also does great YouTube lessons on them) I have been addicted.

I am even teaching a couple of classes at Kate's now for other ladies who like them!!

Here is my latest one just finished, now we are all waiting for the little girl to arrive (should be next few weeks - stay tuned)


With all the sequins, it takes me back to making dancing costumes for my daughter, many moons ago.

I love her little face,  she looks so sweet with those long eyelashes (just like mine haha)


She is surrounded by all sorts of lollies, there's gingerbread men, cupcakes, bonbons, cookies and of course candy canes.

Toe of Stocking

Heel of Stocking


There is just one thing that needs to be finished......her name needs to be embroidered onto a cupcake which will hang off the side, but we need to wait until she is born to find that out !!!


Tuesday, November 17, 2015

CHRISTMAS WREATH EMBROIDERY

I can't believe its been nearly 2 months since my last blog.  I've still been stitching, but haven't taken any photos to blog about.

Back in October, I attending the FignBerry Soiree where I was lucky enough to meet Melissa Grant from One Day In May (my favorite designer).

One of the gift patterns was Melissa's Christmas Wreath.  Her designs are a little bit different, she often features a 3 dimensional effect and this one had holly leaves which gave that  look.


Rather than hang this little embroidery on a wall hanger, I thought I would do as Melissa did and get a lovely frame to display it in.


I know its a Christmas design, but its so nice, I think it can stay out all year round.  It looks so nice near my Paper Tole pictures, I can see it everytime I cook.


Sunday, September 20, 2015

BELLA GARDEN - FNSI

My McKenna Ryan quilt - Bella Garden is a long term project and I am very happy to say, she is almost finished !!!

Thanks to Wendy of Sugarlane Designs,  I spent Friday night  getting the binding ready (there is so much of it!), now all I have to do it put it on.  I just couldn't wait to show you the photos, now that she is back from Mandy my great long-arm quilter friend.


It has taken me almost 2 years to stay on track and keep going, but its worth it now.


Just love the centre panel with those gorgeous flowers and sweet butterflies.


Mandy did a wonderful job of filling in the background with Ricky Doodles (thats what I call them??)  and swirls all around the border... Lovely


I love feathers so I asked to have some put in and look what she came up with.  (I've just noticed  I need to  embroider a little eye on my mouse..oops).


Check out the water fill quilting that goes all around the gorgeous blue water and sky.


My favorite part is the Wisteria, very time consuming to do but it came up a treat.


If you would like to see my progress making this quilt, check out my Bella Garden label on the side, to see how each block came into being  Or pop on over to the McKenna Ryan Group here to see other terrific McKenna Ryan projects

This one is going in the entry hall when its finished.  Its too nice to hide away in a cupboard so I have Mr H rearranging furniture so I can find a wall big enough to hang her.


Tuesday, September 15, 2015

ALASKA QUILT

Last year Mr H and I ventured over to the USA and Canada.  After the 17 hour flight (its such a long way from Australia to anywhere!) we arrived in Vancouver, Canada.  We took a Scenic tour of the Rockies and then a Princess Cruise up to Alaska.

Of course with any holiday, I was anxious to visit as many quilt shops as I could find and lucky for me, I found a couple each stop on the Cruise in Alaska.

I thought what a wonderful way to remember the holiday by buying some material which highlighted the animals found in that part of the world; Moose, Wolves, Bears, Eagles etc...

I came home and stashed my material and forgot all about it (probably got lost in my sewing room).

This winter which has been rather colder than usual, Mr H asked for a quilt so the dogs would sit on his lap.  What a perfect 'man quilt' my Alaskan material has made:


I had purchased panels of animals and also some coordinating brown and blue material.


All I had to do was add the black borders and a few flying geese for colour and there you have it.


Very simple and quick to assemble and I even did the quilting myself (I'm getting braver)


I can even say we saw some of these animals in the wild, brown bears running alongside the train into Jasper, a Moose (minus the antlers) in Banff, lots of birds everywhere but no Wolves!!

Mr H and the dogs, are very happy and there's more room in my sewing room for the next addition of material - everyone's happy :)


Thursday, September 10, 2015

BLACKBIRDS - FINISHED AND FRAMED

Just thought I'd do a short post to show you my finished 'Blackbirds' that I was learning with Kellie Wulfsohn

I know I had showed you the raw edge applique and I was about to have a go at the free-motion quilting........well here she is all framed up.

As you can see, I am extremely happy (sorry about the photo quality)


Here are some close ups of the quilting


The swirls aren't all perfect but overall the bad ones are hidden amongst the good ones.  Once its up on the wall, no-one will notice (I hope)


Saturday, September 5, 2015

FNwF - BUCILLA PROGRESS

Well that was a relaxing Friday night and along with all the other bloggers, which is kindly organised by Cheryl  here is what I got up to......

Now that Jake will be two this Christmas, he deserves a Christmas Stocking fit for a king, and what better than a Train Stocking!!!  I love making Bucilla Felt Stockings so I have allowed plenty of time (cos they do take a while) to do this one

If you have never done a Bucilla before, I have shown a little of what to do:-


  1. Start with a pattern, it might look complicated but if you break it down a little each night, you can do it!


   2.  Gather your equipment, needles - beading and applique, pins, scissors, threads, magnifying glasses (only if you need them, but you probably will), sequins and beads.


My Sequins and bead Box

   3.  Layout your pre-printed felt 


    4.  Follow the instructions, they detail which piece, thread colors, stitch, and sequin to use.

   5.  Once you have embellished your numbered piece with applique and sequins, you can then place onto the main piece and stitch in place.


Stocking in Progress


Oh and please dont think I did all that on Friday night (I'm not Superwomen), I only did his scarf (told you it takes a while) but I do love the fringing that is on the end of it.

Well thats what I got up to on Friday night, how about you???  I'll be over to see what you did throughout the week.

By the way, if you want to see my other Bucilla's check out the label 'Bucilla' on the side.

Happy Sewing
Dawn


Related Posts Plugin for WordPress, Blogger...